20+ Useful Markdown Syntaxes for Developers
Markdown is the new normal for the developers. Learn 20+ helpful markdown syntaxes for blogging, websites, and note-taking.
Markdown is a markup language for formatting text using simple syntaxes. It is widely used for blogging, websites, comment management services, readme files, and documentation. Unlike HTML, markdown doesn't have tags to define structure and features. The markdown syntaxes are combinations of special characters with plain texts.
In this article, we will discuss a list of markdown syntaxes you will use most of the time. It will probably cover the 99% of cases you need markdown. We will learn the syntaxes and how the syntax will render on the browser.
Please note that there are different flavours of markdown available today. For example, GitHub has been using its version of Markdown, where they have added some extra formatting. However, most of the syntaxes work across all the flavours.
If you are interested in learning about the Markdown from the video tutorial, you can check out this one:
⭐ Headings
Headings and sub-headings are the basic needs for any documentation. The heading gives structure. The syntax of the heading starts with a # symbol followed by a space and the heading text. For the first level heading, you should give one #, two # symbols for the second level, and so on.
The following markdown snippet shows the syntaxes of six types of headings. When you render them on the browser, they appear like HTML's H1 to H6 tags.
# H1 - Heading 1
## H2 - Heading 2
### H3 - Heading 3
#### H4 - Heading 4
##### H5 - Heading 5
###### H6 - Heading 6
Here goes the output of the heading syntaxes.
H1 - Heading 1
H2 - Heading 2
H3 - Heading 3
H4 - Heading 4
H5 - Heading 5
H6 - Heading 6
⭐ Inline Code
The inline code syntax uses the backtick symbols(``) around the code to highlight it.
The syntax goes like this:
`This is Code`
Here is the output of the above syntax. Please note that the look and style of the inline code may differ from one to another markdown variants.
This is Code
⭐ Unordered List of Items
HTML has the tags for unordered list(<ul><li>) and ordered list(<ol><li>). In markdown, you can create them in multiple ways. Let us first see the unordered list syntaxes.
To create an unordered list of items, you can use the hyphen(-) and space as a prefix to the list item, as shown below:
- Milk
- Tea
- Beer
It will output a bulleted unordered list like this:
- Milk
- Tea
- Beer
The alternate syntax for the unordered list uses the asterisks(*) symbol instead of the hyphen(-) we used above.
* Milk
* Tea
* Beer
It will result in similar output.
- Milk
- Tea
- Beer
⭐ Ordered List of Items
You can prefix the list items with the 1. and space for the ordered list.
1. Eat
1. Walk
1. Sleep
Output:
- Eat
- Walk
- Sleep
⭐ CheckBox Task List
Often you may want to create a task list like the TODO items. The user can make a task complete by checking a checkbox. An example of it is the Pull Request description on GitHub. You may want your contributors to confirm what kind of changes and tests they have performed out of a given list.
The syntax of the task list is to prefix the list items with a combination of a hyphen(-), square brackets([]) and a space in it. If you want the task item to appear as done, you need to add the letter X in the capital case.
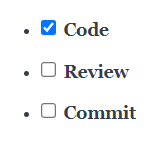
In the example below, the task Code is checked(task done), and the rest are unchecked tasks.
- [X] Code
- [ ] Review
- [ ] Commit
All the markdown flavoured platforms may not support this syntax. The output may appear like this in the supported platforms.

⭐ Code Block
Highlighting a code block is a much-needed feature for technical documentation and blogs. We have seen the syntax for the inline code previously. For the code block syntax, you have to enclose the code block within the three backticks symbol.
```
It is a code block. You can create code syntaxes like JavaScript, HTML, CSS, Bash, and many more.
```
The output will be like a highlighted block of code:
It is a code block. You can create code syntaxes like JavaScript, HTML, CSS, Bash, and many more.
To highlight the language-specific code block, you can add a language name at the end of the initial backticks, as in the following examples.
Here is an example of the JavaScript code block:
```js
function print() {
 console.log('This is is a JavaScript Code Block');
}
```
Here is the output:
function print() {
 console.log('This is is a JavaScript Code Block');
}
To highlight the code block of bash or shell,
```bash
# This is bash
echo 1
```
Here goes the output:
# This is bash
echo 1
⭐ Strikethrough Text
To make a text appear like it is striking through, you need to enclose it within two tildes (~~) symbols.
~~Sharing is NOT about Caring.~~
The output will be:

Please note that the striking through format may not be supported in all the markdown platforms.
⭐ Blockquote Text
Use the > symbol with space as a prefix to render a text as a quote(or blockquote).
> When I say something, I mean it. When I mean it, I do it. When I do, I may fail. When I fail, I start talking about it again!
The output:
When I say something, I mean it. When I mean it, I do it. When I do, I may fail. When I fail, I start talking about it again!
⭐ Bold
You need to use two asterisks(**) symbols as a prefix and a suffix to highlight a text as bold.
**DO NOT UNDERESTIMATE THE POWER OF A PROGRAMMER.**
The output:
DO NOT UNDERESTIMATE THE POWER OF A PROGRAMMER.
⭐ Italic
You need to use one asterisk(*) symbol as a prefix and suffix to highlight a text as italic.
*It is Written in Italics*
The output:
It is Written in Italics
⭐ Bold and Italic
You need to use three asterisks(***) symbols as a prefix and a suffix to highlight a text as both bold and italic.
***You Can Combine Bold and Italics***
The output:
You Can Combine Bold and Italics
⭐ Link
Linking to an external resource is a widely used feature you want to incorporate into your documentation. In HTML, we accomplish it using the anchor(<a>) tag. With markdown, you do it with the following syntax,
[LINK_TEXT](LINK_URL)
Here is an example of using the above syntax to link to my Website.
Did you know I have [Website](https://tapasadhikary.com)?
The output:
Did you know I have Website?
⭐ Image
The syntax of rendering an image is almost similar to linking a URL we learned just now. You need to prefix the syntax of a link with a ! symbol to render an image.

Let's use the above syntax to render the logo of my blog,

The output:

⭐ Linking an Image
We learned about linking and images. Let's learn how to make an image appear as a link. To do that, you need to combine the link and image syntax. You need to use the image syntax in the link syntax's place of LINK_TEXT.
[](hyperlink)
Let's use the my blog's logo to link to my blog's home page,
[](https://blog.greenroots.info)
Clicking on the image below will open up the blog page.
⭐ Emojis
In some of the markdown variants(like GitHub) you can add emojis with the following syntax(Colons : around the emoji name)
:mango: :lemon: :man: :car:
The output
🥭 🍋 👨 🚗
⭐ Table
The table is another much-needed data representational format. The table syntax can be a bit overwhelming to start with, but if you pay attention to it, it is easy!
The anatomy goes like this:
- The table header and the rest of the rows are separated by
| ----------- | ----------- | - Each of the table cells in a row must be enclosed like
| CELL_TEXT |
Now take a look at the table syntax below. You can easily make out the headers Fruit and Emoji. Also the, there are two rows, and each of the rows has two columns(cells)
| Fruit | Emoji |
| ----------- | ----------- |
| Mango | :mango: |
| Lemon | :lemon: |
The Output:
| Fruit | Emoji |
| Mango | 🥭 |
| Lemon | 🍋 |
⭐ Table With Alignments
In the GitHub flavoured markdown, you can quickly align the texts in a table. To do that, you can use a colon(:) on the separators' left, both, and right sides.
:---=> For left align:---:=> For centre align---:=> For the right align
Take a look at the table below, where each of the column texts is differently aligned.
| Fruit(left)      | Emoji(center) | Taste(right)     |
| :---        |    :----:   |          ---: |
| Mango is the king of Fruits      | :mango:       | Sweet, and I love it  |
| Lemon is good for health   | :lemon:        | Sour, mix it in the water     |
The output:

⭐ Horizontal Line
The syntax to get a horizontal line is by specifying three consecutive hyphens(-).
---
The output:
⭐ HTML
Did you know you can also write HTML in the markdown files? It is supported in some of the markdown variants like GitHub.
<p align="center">
 Yes, you can use the allowed raw HTML in the mark-down file.
 This is a paragraph aligned in the centre.
</p>
The output
Yes, you can use the allowed raw HTML in the mark-down file. This is a paragraph aligned in the centre.
⭐ Embed YouTube Video
Many developers and tech writers want to embed a YouTube video using the markdown syntax. Unfortunately, there is no default syntax for it. However, you can link to a youtube video using its thumbnail image the same way we have learned to link an image.
Here goes the syntax,
[](YOUTUBE_VIDEO_LINK)
Let's do it for one of the videos,
[](https://www.youtube.com/watch?v=OulZeVtZhZQ)
The output:
⭐ Table of Content
The last thing we will learn is how to create a table of content in a markdown doc.
Say you have a heading called Unpopular Opinion and want to create a link to that section of the doc. So first, you need to create the kebab case of the heading and use it as a link.
- [Unpopular Opinion](#unpopular-opinion)
That's all for now. You can find all these syntaxes in this Opensource GitHub Repository as well. This repository may also contain additional syntaxes and tips as it grows with contributions.
A ⭐ to the repo will motivate all contributors
Before we end, I will share my knowledge on,
- 🌐 Web Development(JavaScript, ReactJS, Next.js, Node.js, so on...)
- 🛡️ Web Security
- 💼 Career Development
- 🌱 Opensource
- ✍️ Content Creation
Let's connect,
